Angular7 で Web アプリを作ろう - Bootstrap 4 を Angular Material に変える
今日すること
こんにちは、ふるてつです。
GW前半。
今回のテーマはAngular Materialです。
最近まわりの人がAngular Materialを使っているのをうらやましく思い、わたしもBootstrapを乗せ換えて使ってみることにしました。
とにかく動きがきれいで魅力的に思えましたし、ソースもわりとシンプルでした。
Bootstrap のアンインストール
そこでまずは Bootstrap関連のパッケージをアンインストールします。
jQueryもBootstrapが依存していたのですが不要になりました。
npm uninstall --save @ng-bootstrap/ng-bootstrap
npm uninstall --save bootstrap
npm uninstall --save jquery popper.js
Angular Materialのインストール
次にAngular Materialをインストールします。
下記リファレンスを参考にします。
https://material.angular.io/guide/getting-started
Step 1: Install Angular Material, Angular CDK and Angular Animations
まずnpmコマンドでMaterialをインストール。
npm install --save @angular/material @angular/cdk @angular/animations
Step 2: Configure animations
リファレンスとは若干違いますが、MaterialModuleを別途新しく追加します。
ng generate module ./utils/Material
使用する可能性があるモジュールをMaterialModuleに全部追加しました。
中身は下記を参照してください。
MaterialModuleのソースコード
import { NgModule } from '@angular/core';
import { CommonModule } from '@angular/common';

import { MatGridListModule } from '@angular/material/grid-list';
import { MatInputModule } from '@angular/material/input';
import { MatFormFieldModule } from '@angular/material/form-field';
import { MatCardModule } from '@angular/material/card';
import { MatButtonToggleModule } from '@angular/material/button-toggle';
import { MatDividerModule } from '@angular/material/divider';
import { MatIconModule } from '@angular/material/icon';
import { MatButtonModule } from '@angular/material/button';
import { MatTableModule } from '@angular/material/table';
import { MatProgressSpinnerModule } from '@angular/material/progress-spinner';

@NgModule({
  declarations: [],
  imports: [
    CommonModule,
    MatGridListModule,
    MatInputModule,
    MatFormFieldModule,
    MatCardModule,
    MatButtonToggleModule,
    MatDividerModule,
    MatIconModule,
    MatButtonModule,
    MatTableModule,
    MatProgressSpinnerModule,
  ],
  exports: [
    MatGridListModule,
    MatInputModule,
    MatFormFieldModule,
    MatCardModule,
    MatButtonToggleModule,
    MatDividerModule,
    MatIconModule,
    MatButtonModule,
    MatTableModule,
    MatProgressSpinnerModule
  ]
})
export class MaterialModule { }
Step 3: Import the component modules
こちらもリファレンスとは若干異なります。
上記で追加したMaterialModuleをapp.module.tsにインポートします。
下記のインポート文を追加しMaterialModuleを@NgModuleに取り込みます。
import { MaterialModule } from 'src/app/utils/material/material.module';

@NgModule({
  ...
  imports: MaterialModule,
  ...
})
Step 4: Include a theme
styles.cssにMaterialビルトインのcssをインポートしておきます。
数種類ありますので好きなものを選ぶと良いでしょう。
@import "~@angular/material/prebuilt-themes/indigo-pink.css";
Step 5: Gesture Support
mat-slide-toggle、mat-slider、matTooltipがhammerjsに依存しているそうなので、インストールしておきます。
頻繁に使う気はしないのですがこの際入れておきます。
npm install --save hammerjs
Step 6 (Optional): Add Material Icons
今回はこちらは実施していません。
Material アイコンを今後使用するようであればその時に改めて行います。
くずれた体裁の整形
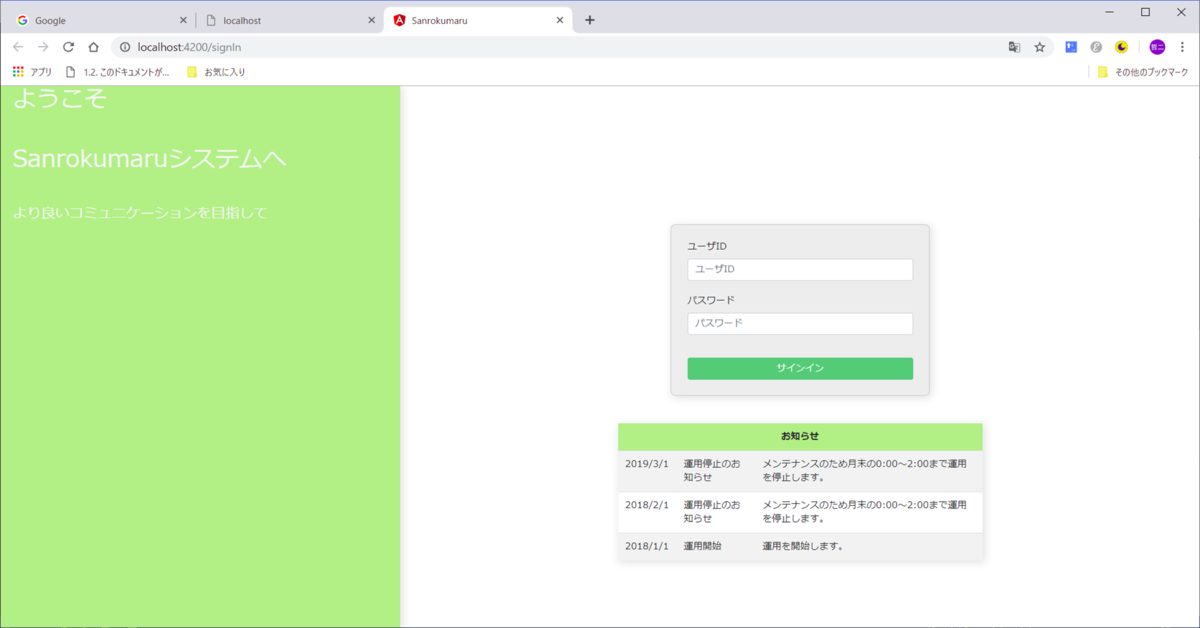
いったんAngularを起動すると、案の定、体裁がおかしくなっています。
変更前)
変更後)
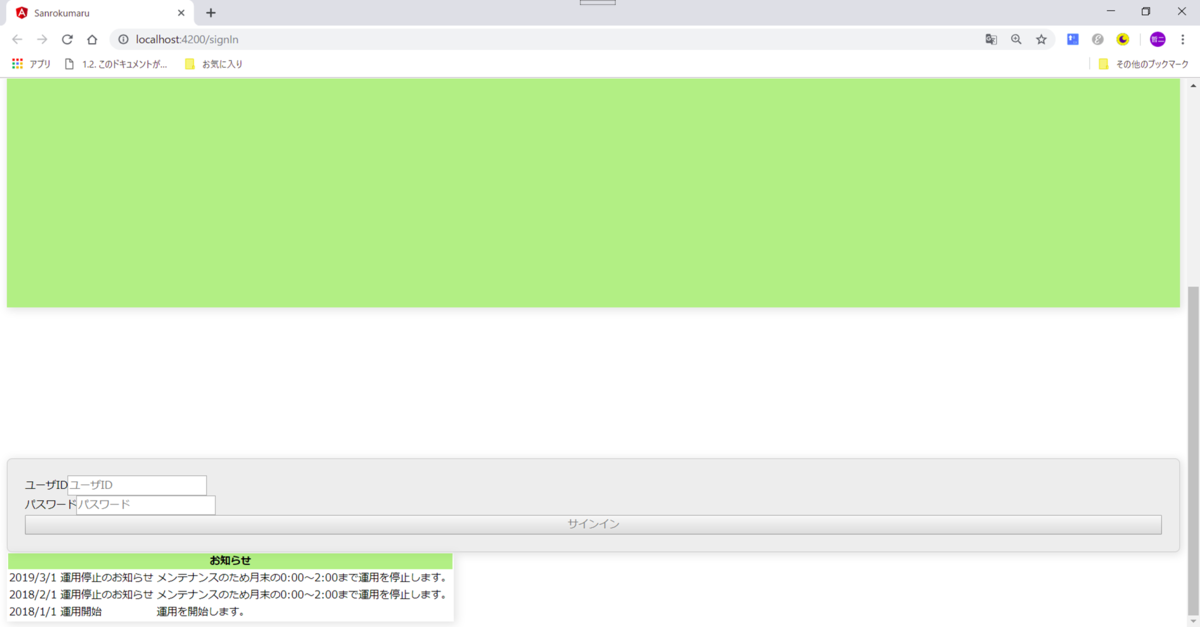
今日は取り急ぎサインイン画面を修正します。
CSS Grid の設定
MaterialにはBootstrapのように細かく指定可能なグリッドシステムはない模様です。
Angular Flex-Layoutを使うと良さそうですが、今回まずはCSS Gridを使用します。
わたしの使い方だとこちらで十分そうでなので、作り方はこちらを参考にしました。
qiita.com
サインイン画面は主に4つのパーツに分けています。
それぞれを<div>タグでくくり、下記のようにidを振っています。
- signInContent(これは全体)
- welcome(ようこそ部分)
- signIn(サインイン部分)
- forgotPassword(パスワード忘れ部分)
- informations(お知らせ部分)
サインイン画面(sign-in.component.html)の概要はこちら
<div id="signInContent">
  <div id="welcome">
    // ようこそ部分
    <h1>ようこそ</h1>
    <h1>Sanrokumaruシステムへ</h1>
    以下略…
  </div>
  <div id="signIn">
    // サインイン部分
    以下略…
  </div>
  <div id="forgotPassword">
    // パスワード忘れ部分
    以下略…
  </div>
  <div id="informations">
    // お知らせ部分
    以下略…
  </div>
</div>
PC画面の場合は、画面左半分にwelcomeを配置します。
あと残りはすべて右側にsignIn、forgotPassword、informationsの順に上から並べます。
その定義は全体ではなくコンポーネント固有のsign-in.component.cssに書き入れました。
sign-in.component.cssの内容はこちら
#signInContent {
  display: grid;
  margin: 0;
  min-height: 100vh;
  grid-template-rows: M70 1fr;
  grid-template-columns: 50% 40% 1fr;
  grid-template-areas:
    /* ↓画面左側はすべてwelcome、右側半分はsignIn、forgotPassword、informationsの順に並べる */
    "welcome signIn"
    "welcome forgotPassword"
    "welcome informations";
}

#welcome {
  grid-area: welcome;
  margin-right: 7rem;
  padding-left: 3rem;
  color: whitesmoke;
  background-color: #66BB6A;
  line-height: 7rem;
  height: 100vh;
}

#signIn {
  grid-area: signIn;
  margin-top: 5rem;
}

#forgotPassword {
  grid-area: forgotPassword;
  margin-top: 1rem;
  text-align: center;
}

#informations {
  grid-area: informations;
}
Media Query の設定
あとはレスポンシブ対応ですが、こちらはMedia Queryを使用しました。
設定方法は下記を参考にしました。
sole-color-blog.com
sign-in.component.cssに追記したMedia Queryの内容はこちら
@media screen and (max-width: 640px) {

  /*ここにスマホ用スタイルを記述*/
  h1 {
    font-size: 1.5rem;
  }

  h2 {
    font-size: 1.2rem;
  }

  h3 {
    font-size: 1rem;
  }

  #signInContent {
    grid-template-rows: M100;
    grid-template-columns: 100%;
    grid-template-areas:
      /* ↓welcome、signIn、forgotPassword、informationsの順に縦に並べる */
      "welcome"
      "signIn"
      "forgotPassword"
      "informations";
  }

  #welcome {
    margin-right: 0;
    padding-left: 1rem;
    font-size: 0.5rem;
    line-height: 1.5rem;
    height: 10rem;
    text-align: center;
  }
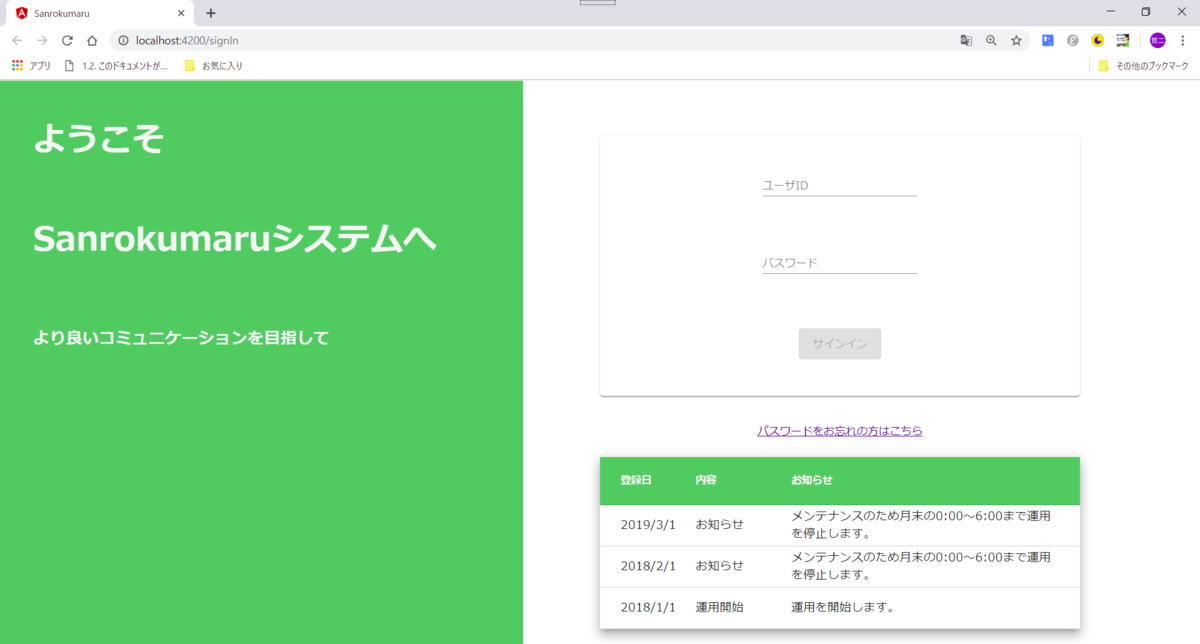
修正後の画面は下記のようになりました。
色合いもマテリアルチックなものに変えたので、若干雰囲気が変わりました。
以前より良い感じになったと思います。
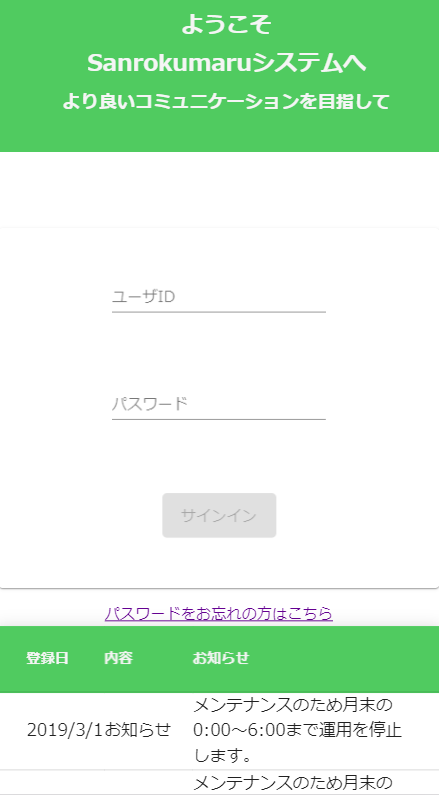
携帯サイズの時は下記になります。
今日の感想
今日はBootstrapをAngular Materialに乗せ換えました。
Bootstrapが良くないという訳ではなかったのですが、わたしのまわりに使っている者がおらず、なかなか進まなかったところでしたので、GWを期に変更しました。
Angular Materialを使っている人は多いので、詰まったらすぐ聞けるのがいいですね。
Media Queryについては、はじめて使いましたが、簡単にレスポンシブ対応ができました。
わたしはBootstrapなしではできないものと勘違いしていましたので、良い勉強になりました。
今回、携帯の画像サイズをいくつまでにすべきか迷ったのですが、取り急ぎmax-width: 640px以下を携帯と判定しました。
それについては正解がいまひとつ分からないので、別途調べようと思います。
では、今日もお疲れ様でした。
topcoderの過去問 - ABBA
今日すること
こんにちはふるてつです。
今日は Topcoder の過去問です。
問題について
今日の問題は ABBA。
引数で開始文字と目標文字が与えられます。
可能な操作は開始文字に対して末尾に "A" を追加する。
もしくは文字を反転(A ⇒ B、B ⇒ A)し、末尾に "B" を追加する。
この2つの操作を繰り返して、目標文字と一致したら "Possible" 、一致しなければ "Impossible" を返します。
英語の原文はこちらです
Problem Statement
One day, Jamie noticed that many English words only use the letters A and B. Examples of such words include "AB" (short for abdominal), "BAA" (the noise a sheep makes), "AA" (a type of lava), and "ABBA" (a Swedish pop sensation).


Inspired by this observation, Jamie created a simple game. You are given two s: initial and target. The goal of the game is to find a sequence of valid moves that will change initial into target. There are two types of valid moves:

Add the letter A to the end of the string.
Reverse the string and then add the letter B to the end of the string.
Return "Possible" (quotes for clarity) if there is a sequence of valid moves that will change initial into target. Otherwise, return "Impossible".

Definition
Class: ABBA
Method: canObtain
Parameters: String, String
Returns: String
Method signature: String canObtain(String initial, String target)
(be sure your method is public)
Limits
Time limit (s): 2.000
Memory limit (MB): 256
Constraints
- The length of initial will be between 1 and 999, inclusive.
- The length of target will be between 2 and 1000, inclusive.
- target will be longer than initial.
- Each character in initial and each character in target will be either 'A' or 'B'.
Examples
0)
"B"
"ABBA"
Returns: "Possible"
Jamie can perform the following moves:
Initially, the string is "B".
Jamie adds an 'A' to the end of the string. Now the string is "BA".
Jamie reverses the string and then adds a 'B' to the end of the string. Now the string is "ABB".
Jamie adds an 'A' to the end of the string. Now the string is "ABBA".
Since there is a sequence of moves which starts with "B" and creates the string "ABBA", the answer is "Possible".
1)
"AB"
"ABB"
Returns: "Impossible"
The only strings of length 3 Jamie can create are "ABA" and "BAB".
2)
"BBAB"
"ABABABABB"
Returns: "Impossible"
3)
"BBBBABABBBBBBA"
"BBBBABABBABBBBBBABABBBBBBBBABAABBBAA"
Returns: "Possible"
4)
"A"
"BB"
Returns: "Impossible"
This problem statement is the exclusive and proprietary property of TopCoder, Inc. Any unauthorized use or reproduction of this information without the prior written consent of TopCoder, Inc. is strictly prohibited. (c)2003, TopCoder, Inc. All rights reserved.
わたしの解答
わたしの解答コードは下記になります。
while文で目標文字と一致するまで2つの操作を繰り返しました。
目標文字より桁数が大きくなり一致しようがなくなった場合は "Impossible" を返して終了です。
package practice;

/**
 * ABBA
 * @author furutetsu
 *
 */
public class ABBA {

    private static final String MSG_POSSIBLE = "Possible";
    private static final String MSG_IMPOSSIBLE = "Impossible";
    private static final String CHAR_A = "A";
    private static final String CHAR_B = "B";
    private static final String CHAR_TEMPORARY = "@";

    /**
     * canObtain
     * @param initial 初期の文字
     * @param target 目標の文字
     * @return 可能/不可能
     */
    public String canObtain(String initial, String target) {

        String abba = initial;
        System.out.println("abba:" + abba);

        while (true) {

            if (over(abba, target)) {
                return MSG_IMPOSSIBLE;
            }

            abba = addA(abba);
            System.out.println("abba:" + abba);

            if (isMatchTarget(abba, target)) {
                return MSG_POSSIBLE;
            }

            abba = reverse(abba);
            System.out.println("abba:" + abba);

            if (isMatchTarget(abba, target)) {
                return MSG_POSSIBLE;
            }

        }

    }

    /**
     * 終了判定
     * @param abba ABBAの文字
     * @param target 目標の文字
     * @return ABBAの文字
     */
    private boolean over(String abba, String target) {
        return abba.length() > target.length();
    }

    /**
     * 末尾にAを追加
     * @param abba ABBAの文字
     * @return ABBAの文字
     */
    private String addA(String abba) {
        return abba + CHAR_A;
    }

    /**
     * 反転して末尾にBを追加
     * @param abba ABBAの文字
     * @return ABBAの文字
     */
    private String reverse(String abba) {
        return abba.replaceAll(CHAR_A, CHAR_TEMPORARY).replaceAll(CHAR_B, CHAR_A).replaceAll(CHAR_TEMPORARY, CHAR_B)
                + CHAR_B;
    }

    /**
     * 一致判定
     * @param abba ABBAの文字
     * @param target 目標の文字
     * @return ABBAの文字
     */
    private boolean isMatchTarget(String abba, String target) {
        return abba.equals(target);
    }

}
下はテストコードです。
package test;

import static org.hamcrest.CoreMatchers.*;
import static org.junit.Assert.*;

import org.junit.jupiter.api.Test;

import practice.ABBA;

class ABBATest extends ABBA {

    @Test
    void testCanObtain() {
        assertThat(canObtain("B", "ABBA"), is("Possible"));

        assertThat(canObtain("AB", "ABB"), is("Impossible"));

        assertThat(canObtain("BBAB", "ABABABABB"), is("Impossible"));

        assertThat(canObtain("A", "BB"), is("Impossible"));

    }

}
今日の感想
今日の問題の難易度は「Medium」でした。
これまでに解いた「Easy」の問題とあまり違いは感じなかったですけど、今日もいい頭の体操になりました。
ではまた。
Topcoderの過去問 - A0Paper
今日すること
こんにちはふるてつです。
今日は Topcoder の過去問です。
問題について
今日の問題は A0Paper。
A3、A4 などお馴染みの用紙サイズを使った問題です。
引数で A1 が何枚、A2 が何枚 A3 が何枚と指定され、指定された用紙を組み合わせて、 A0 サイズの用紙1枚分が作れれば "Possible" を返します。
作れなければ "Impossible" を返すという問題です。
英語の原文はこちらです
Problem Statement
"Letter", "Legal", and "Tabloid" are examples of paper sizes. Both Letter and Legal are 8 and half inches wide, but while Legal has length 14 inches, Letter is 11 inches long. This means that 14 letters have the same total length as 11 legals. Unless, of course, by "Letter" we mean "Government Letter" or instead of "Legal" we want "Junior Legal". In the days of manual paper making, the length of 11 inches was quite practical, as it is reportedly about a quarter of "the average maximum stretch of an experienced vatman's arms". Luckily for you, this problem is about a much more systematic way of cutting paper: the A series.

The papers in the A series are numbered A0, A1, A2, and so on until infinity. A0 is the largest of these papers. The area of an A0 paper is exactly 1 square meter.

All paper sizes in the A series have the same aspect ratio. More precisely, the ratio between the longer side and the shorter side of any paper in the A series is exactly equal to the square root of 2.

For each i, the longer side of the A(i+1) paper is equal to the shorter side of the A(i) paper.

From the previous two definitions it follows that the A series has the following useful property: Whenever you take an A(i) paper and you cut it in half (using a cut that passes through the centers of its longer sides), you will get two pieces of an A(i+1) paper. In other words, A1 is one half of A0, A2 is one half of A1, and so on.

You are given a A. A[i] represents the number of papers of size A(i) you have in stock. For example, A[4] is the number of A4 papers you currently have.

You are not allowed to cut paper in any way. You can only connect papers (seamlessly and without any waste) by taping them together. The papers you connect this way must not overlap. Can you take some of the papers you have and assemble a paper of size A0? Return "Possible" if it can be done and "Impossible" otherwise.

Definition
Class: A0Paper
Method: canBuild
Parameters: int[]
Returns: String
Method signature: String canBuild(int[] A)
(be sure your method is public)
Limits
Time limit (s): 2.000
Memory limit (MB): 256
Notes
- The return value is case-sensitive. Make sure you return the string exactly as shown in the problem statement.
Constraints
- A will contain between 1 and 21 elements, inclusive.
- Each element of A will be between 0 and 220, inclusive.
Examples
0)
{0,3}
Returns: "Possible"
We have 0 pieces of A0 paper and 3 pieces of A1 paper. We can combine the two of the three A1 papers to get an A0.
1)
{0,1,2}
Returns: "Possible"
This time, we can combine two A2 papers to get a second A1. Afterwards, the two of A1s (the original one and the one we made from the two A2s) can be combined to obtain an A0.
2)
{0,0,0,0,15}
Returns: "Impossible"
An A0 paper can be assembled from 16 A4 papers, but here we only have 15.
3)
{2,0,0,0,0,0,0,3,2,0,0,5,0,3,0,0,1,0,0,0,5}
Returns: "Possible"
We already have two pieces of A0 paper, so we can just take one of them and we are done.
This problem statement is the exclusive and proprietary property of TopCoder, Inc. Any unauthorized use or reproduction of this information without the prior written consent of TopCoder, Inc. is strictly prohibited. (c)2003, TopCoder, Inc. All rights reserved.
わたしの解答
わたしの解答コードは下記になります。
用紙の組み合わせを総当たりでチェックするようにしました。
ちょうどA01枚分になったときにループを抜けます。
import java.math.BigDecimal;
import java.util.Arrays;

public class A0Paper {

    private static final String MSG_POSSIBLE = "Possible";
    private static final String MSG_IMPOSSIBLE = "Impossible";

    public String canBuild(int[] A) {
        System.out.println("A:" + Arrays.toString(A));

        // 引数なし
        if (A.length == 0) {
            return MSG_IMPOSSIBLE;
        }

        // A0をすでに手にしている場合
        if (A[0] > 0) {
            System.out.println("A[0] > 0");
            return MSG_POSSIBLE;
        }

        // 紙の総数を計算する
        int combinationSumOfPapers = sumarizeCombinationsOfPapers(A);
        System.out.println("sumOfPapers:" + combinationSumOfPapers);

        // 計算用のバッファ
        int[] buf = new int[A.length];

        // 判定とインクリメント
        for (int i = 0; i <= combinationSumOfPapers; i++) {
            System.out.println("buf:" + Arrays.toString(buf));
            if (isValid(buf)) {
                System.out.println("Possible");
                return MSG_POSSIBLE;
            }
            System.out.println("Invalid");
            increment(A, buf);
        }

        System.out.println("impossible");
        return MSG_IMPOSSIBLE;

    }

    /*
     * 紙の組合せ総数を計算する。
     */
    private int sumarizeCombinationsOfPapers(int[] A) {
        int count = 1;
        for (int i = 0; i < A.length; i++) {
            count *= A[i] + 1;
            System.out.println("A["+ i +"]:" + (A[i]));
            System.out.println("count:" + count);
        }

        return count;
    }

    /*
     * Papersがちょうど1枚分になるか判定する。
     */
    private boolean isValid(int[] buf) {
        BigDecimal count = BigDecimal.valueOf(0);
        for (int i = 0; i < buf.length; i++) {
            if (buf[i] > 0) {
                count = count.add(BigDecimal.valueOf(Math.pow(2, -i) * buf[i]));
            }
        }
        System.out.println("count:" + count);
        if (BigDecimal.valueOf(1).compareTo(count) == 0) {
            return true;
        }
        return false;

    }

    /*
     * bufをインクリメントする。
     */
    private void increment(int[] A, int[] buf) {
        for (int i = buf.length - 1; i >= 0; i--) {
            if (buf[i] < A[i]) {
                buf[i]++;
                return;
            }
            buf[i] = 0;
        }
    }
}
下はテストコードです。
import static org.hamcrest.CoreMatchers.*;
import static org.junit.Assert.*;

import org.junit.jupiter.api.Test;

import practice.A0Paper2;

class A0PaperTest extends A0Paper2 {

    @Test
    void testCanBuild_01() {
        assertThat(canBuild(new int[] { 0, 3 }), is("Possible"));

    }

    @Test
    void testCanBuild_02() {
        assertThat(canBuild(new int[] { 0, 1, 2 }), is("Possible"));

    }

    @Test
    void testCanBuild_03() {
        assertThat(canBuild(new int[] { 0, 0, 0, 0, 15 }), is("Impossible"));

    }

    @Test
    void testCanBuild_04() {
        assertThat(canBuild(new int[] { 2, 0, 0, 0, 0, 0, 0, 3, 2, 0, 0, 5, 0, 3, 0, 0, 1, 0, 0, 0, 5 }),
                is("Possible"));

    }
}
今日の感想
今日の問題も難易度は低く「easy」でした。
今回もStream APIは使用していません(いま勉強中)
今日もいい頭の体操になりました。
ではまた。
今夜は社内AWSもくもく会 - ELBを利用する
今日すること
こんにちはふるてつです。
今回は社内 AWS もくもく会の内容です。
ELB(Elastic Load Balancer)のおはなしになります。
それぞれ別の AZ に2台の EC2 インスタンスを立てて、ELB を利用してそれら 2台を冗長化構成にしてみます。
2台目の EC2 作成
AMI を作成
これまでに作った EC2 の複製を作ります。
まずは起動中の EC2 から AMI を作成します。
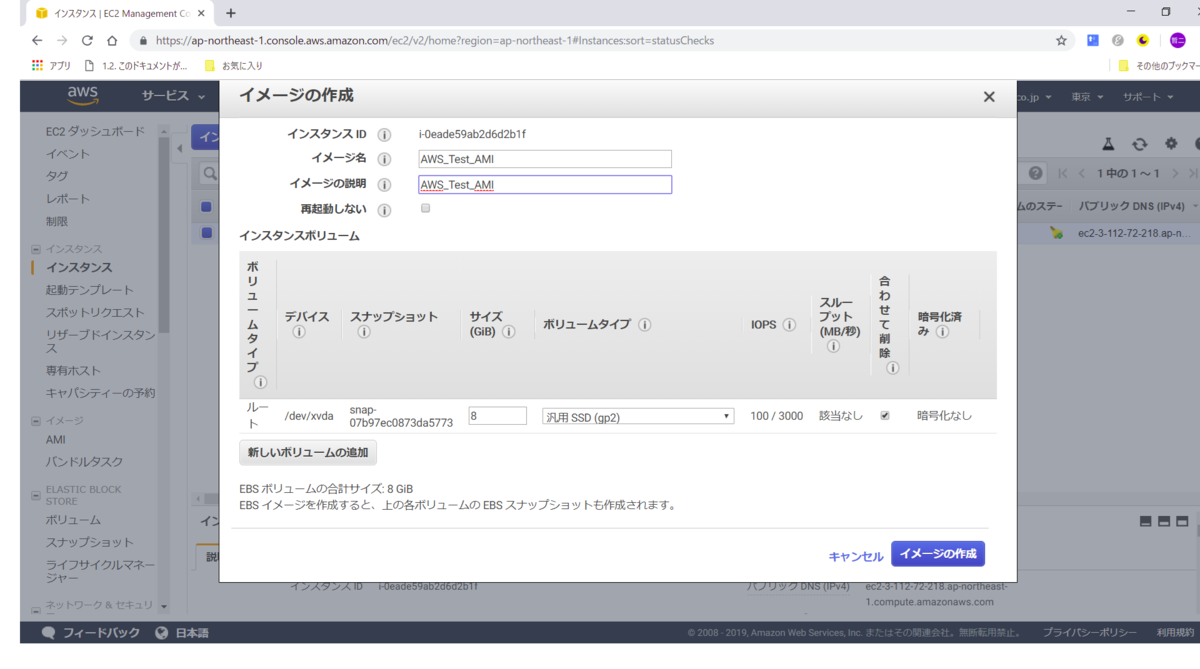
起動中のインスタンスを選択して「アクション」ボタンをクリックし、「イメージ」 ⇒ 「イメージの作成」を選んでいきます。

ポップアップが表示されるので、下記のように「イメージ名」、「イメージの説明」を入力して、「イメージの作成」をクリックします。
「再起動しない」欄は非推奨らしく、チェックはしません。
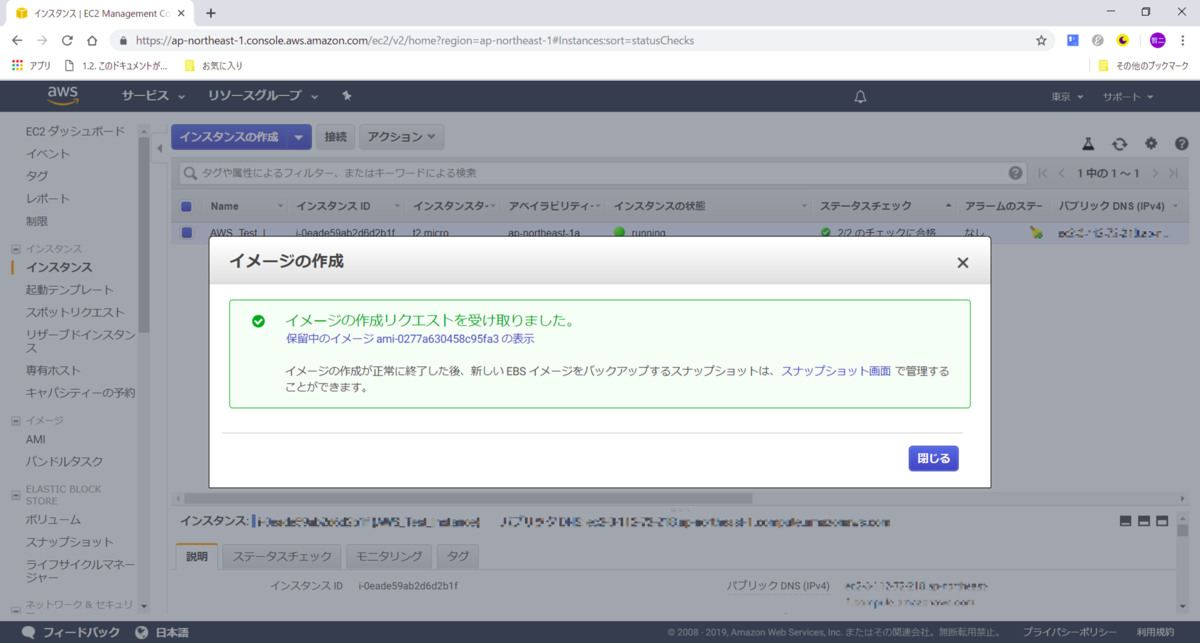
一旦完了です。
サブネット追加
まず新たにサブネットを作成します。
コピー元の EC2 とは別の AZ にします。
メニューからサブネットの画面を表示して「サブネットの作成」ボタンをクリックします。

「名前タグ」、「VPC」、「AZ」、「IPv4 CIDRブロック」欄には下記を入力します。
VPC 欄はこれまでに使っている VPC を。
アベイラビリティゾーン(AZ)は1つ目のサブネットとは別の AZ(ap-north-east-1C)を設定し、
CIRDブロックは 10.0.1.0/24 を設定します。
(最初に作成したサブネットが 10.0.0.0/24 でしたので次のブロックは 10.0.1 になります)

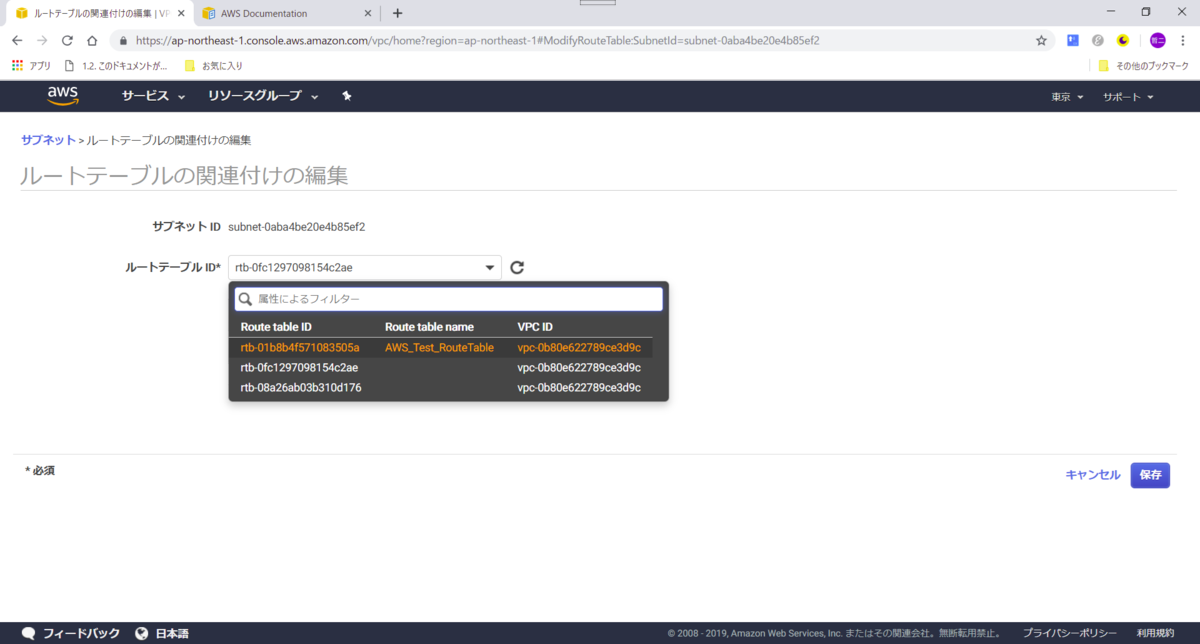
作成したサブネットにルートテーブルの紐づけを追加します。
「ルートテーブルの関連付けの編集」をクリックします。

上記で作っていた Route table に紐づけます。
EC2 を追加
次に上記で作成したサブネットに、AMI をもとに別の EC2 インスタンスを作成します。
まず AMI を選択して「起動」ボタンをクリックします。

 インスタンスウィザード画面が表示されるので、1台目の EC2 と同様の設定をしていきます。
タイプはもちろん無料枠のマイクロにします。
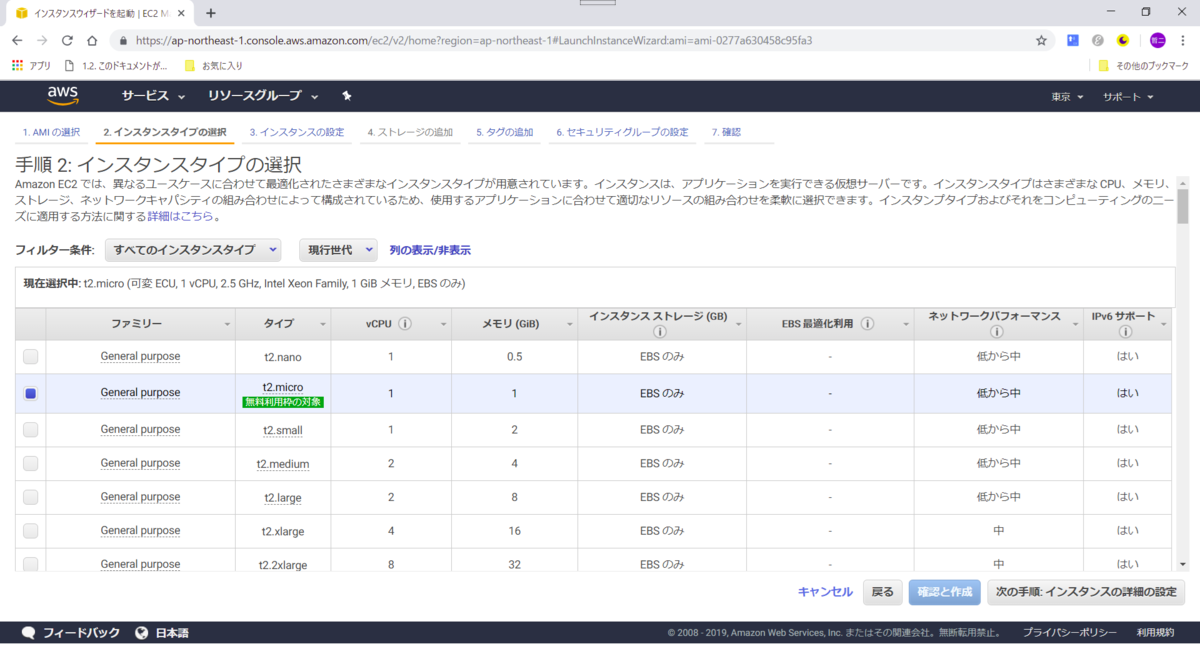
サブネットは上記で作成した 10.0.1.0/24 を選択します。
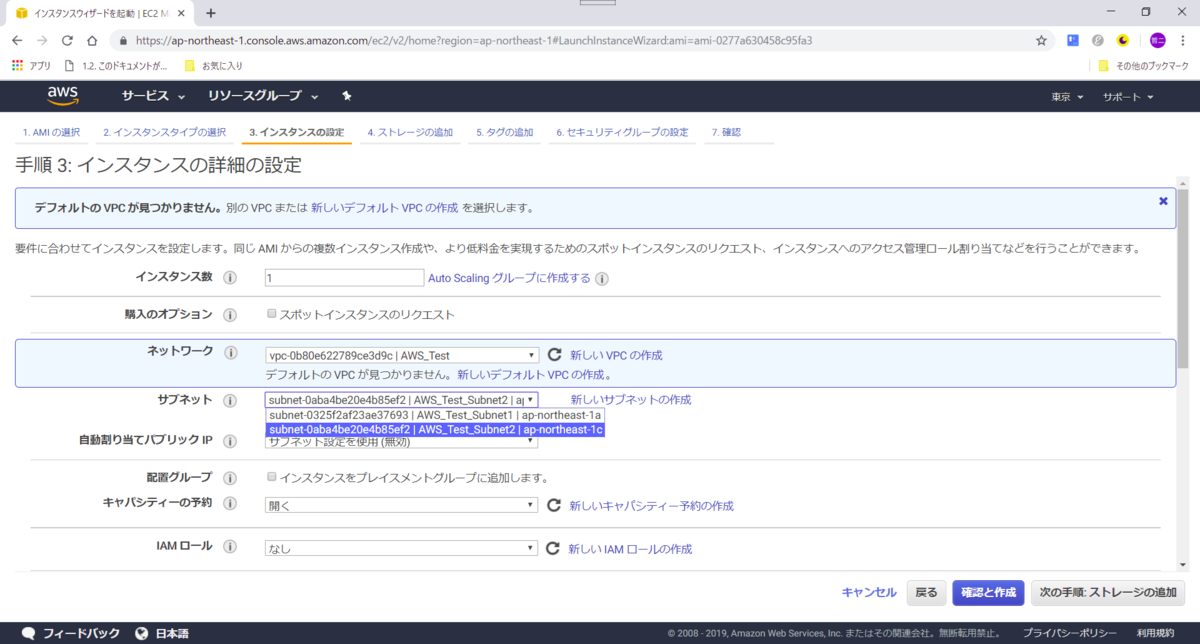
他は下記のようになります。
以前作成したEC2とほぼ同様になります。


 最後にキーペアは既存を選びます。
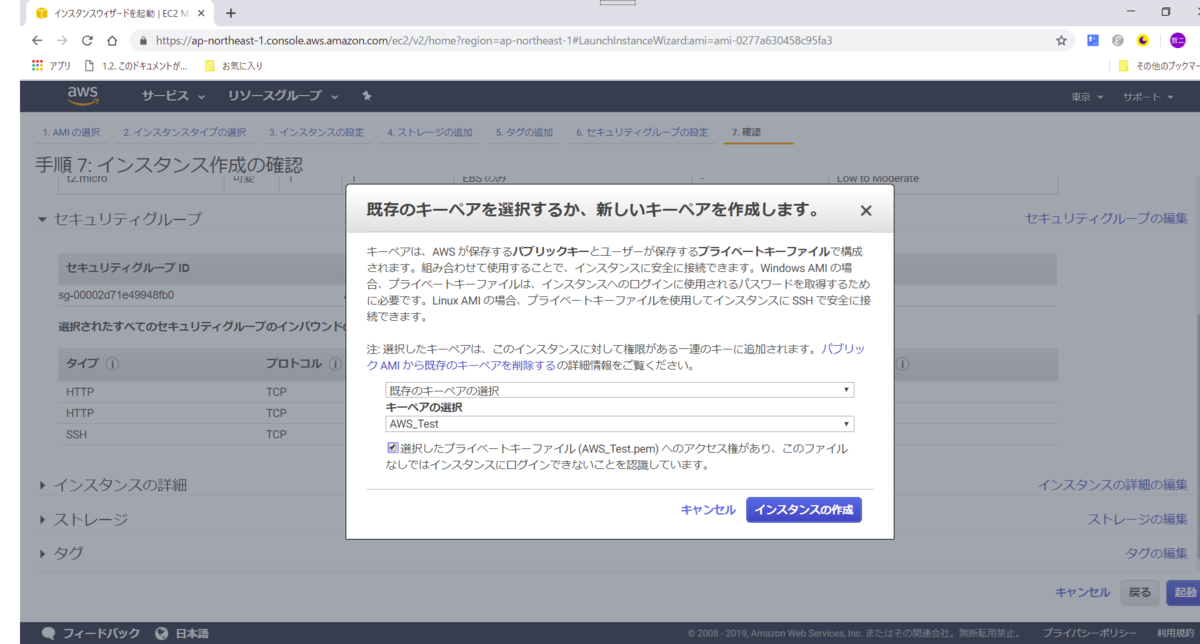
ELB を作成
ELB 用のセキュリティグループ を作成する
ELB 用のセキュリティグループは HTTP のみ許可します。
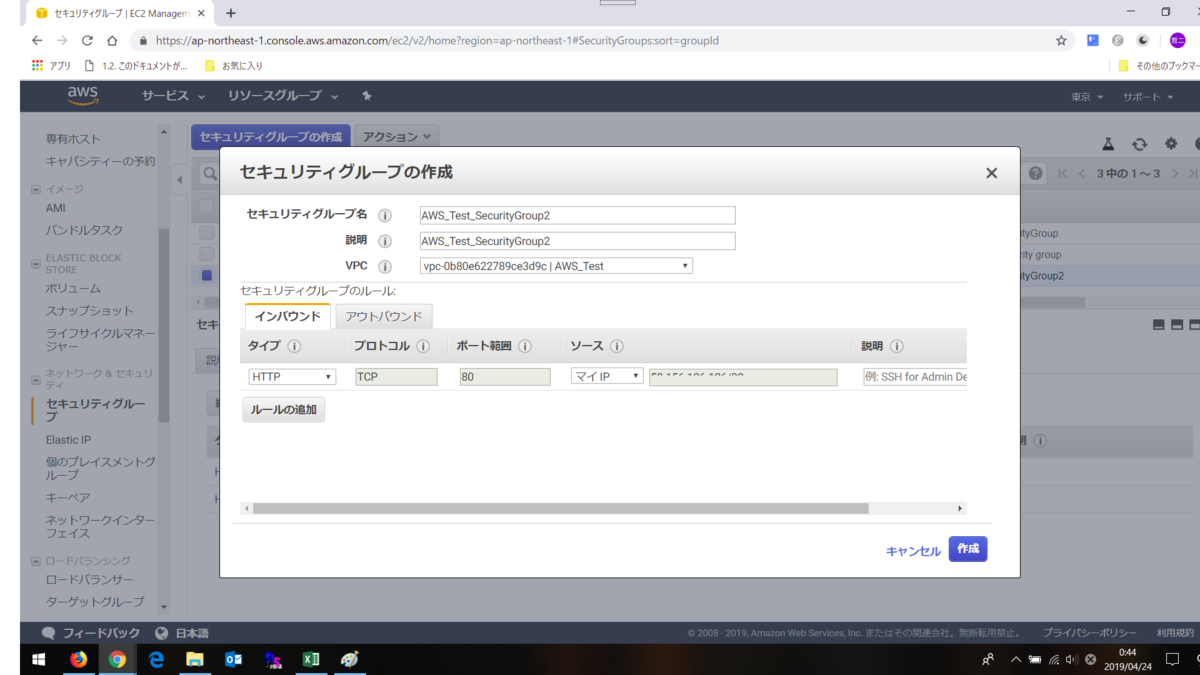
ELB を作成する
「メニュー」 ⇒ 「ロードバランサ」でロードバランサ画面を表示し、「ロードバランサの作成」ボタンをクリックします。
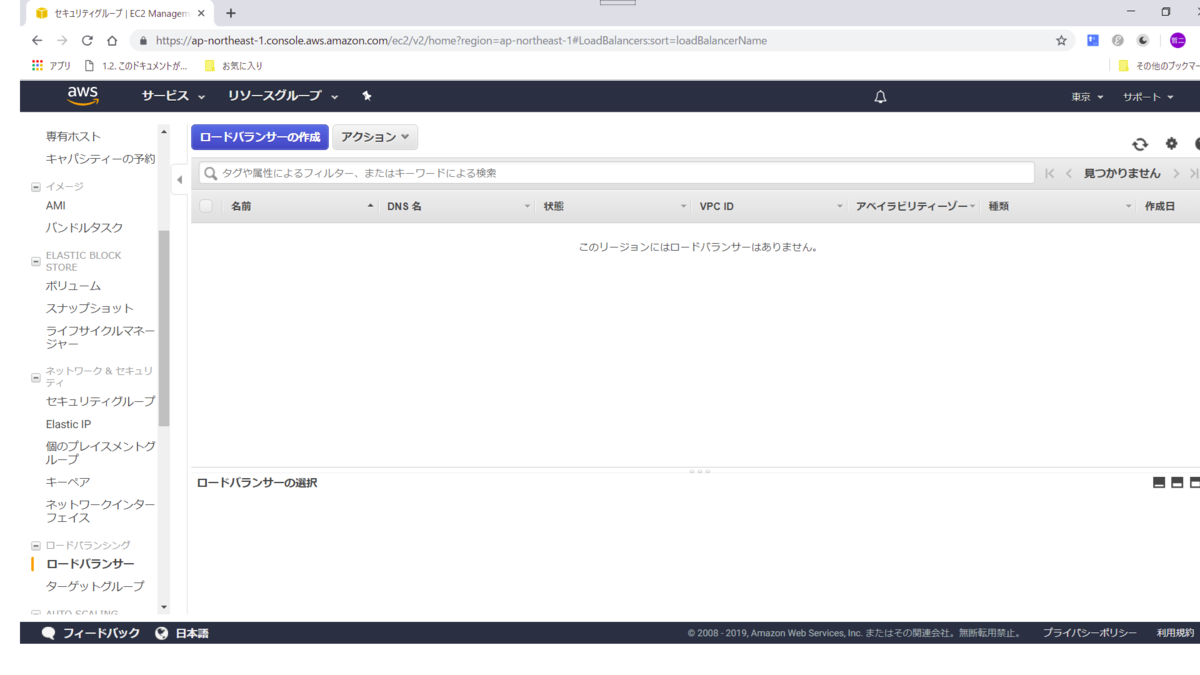
下記の画面は一番左の「HTTP」「HTTPS」をクリックします。
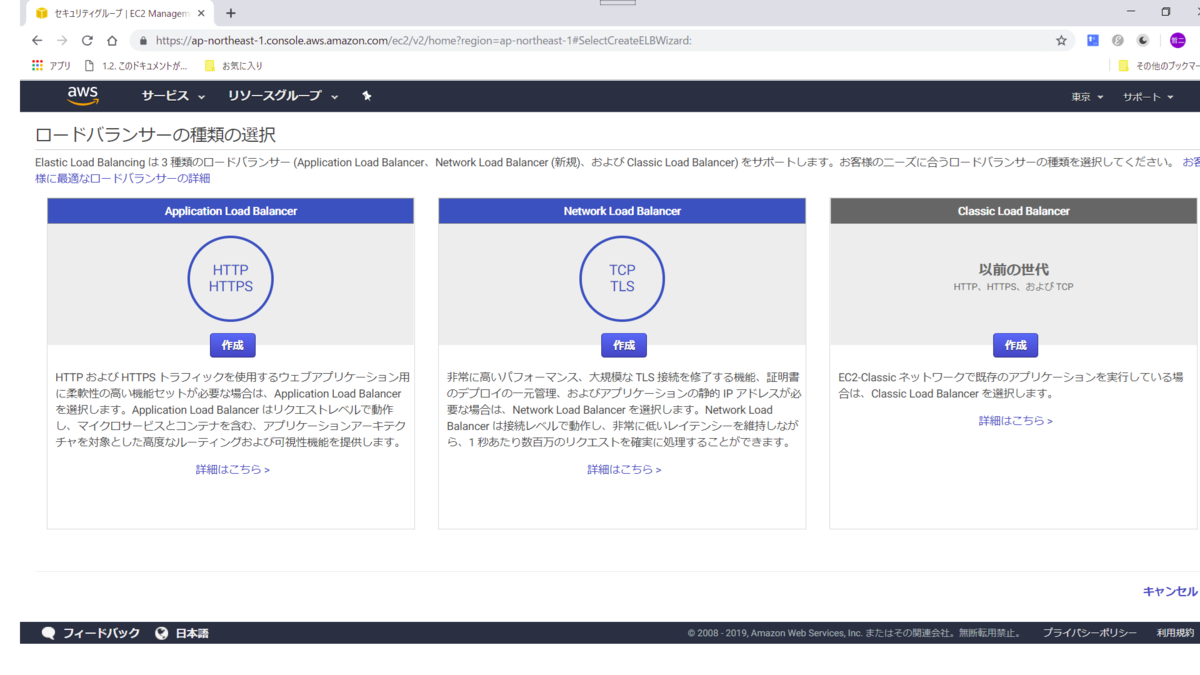
 以下は手順1の下半分です。

ElB用の新しく作成したセキュリティグループを選択します。

ルーティングの設定「HTTP」80番ポートを使用します。
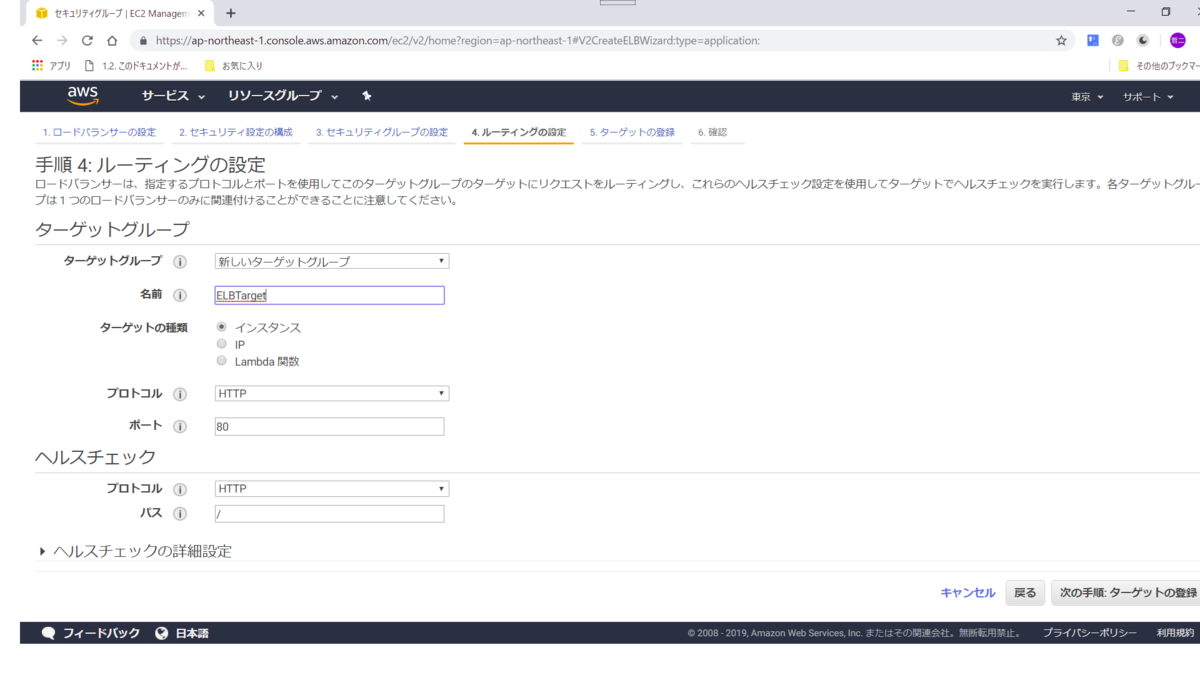
ターゲットに EC2 インスタンス2台を選択します。
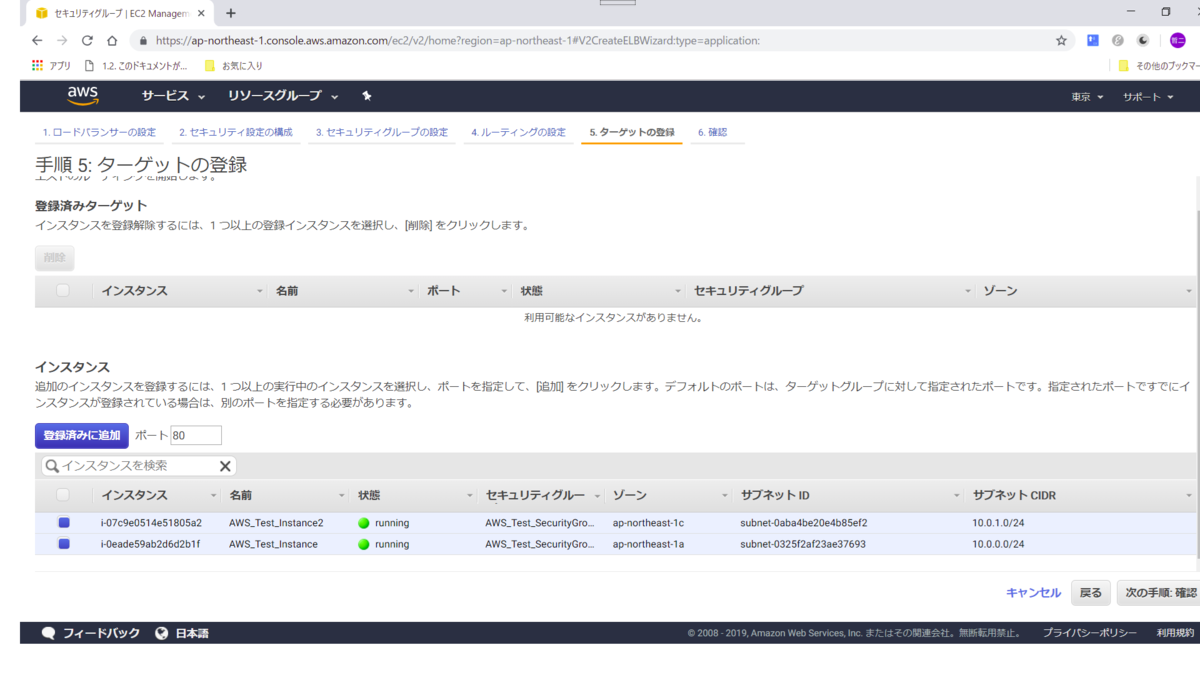
この画面で完了です。
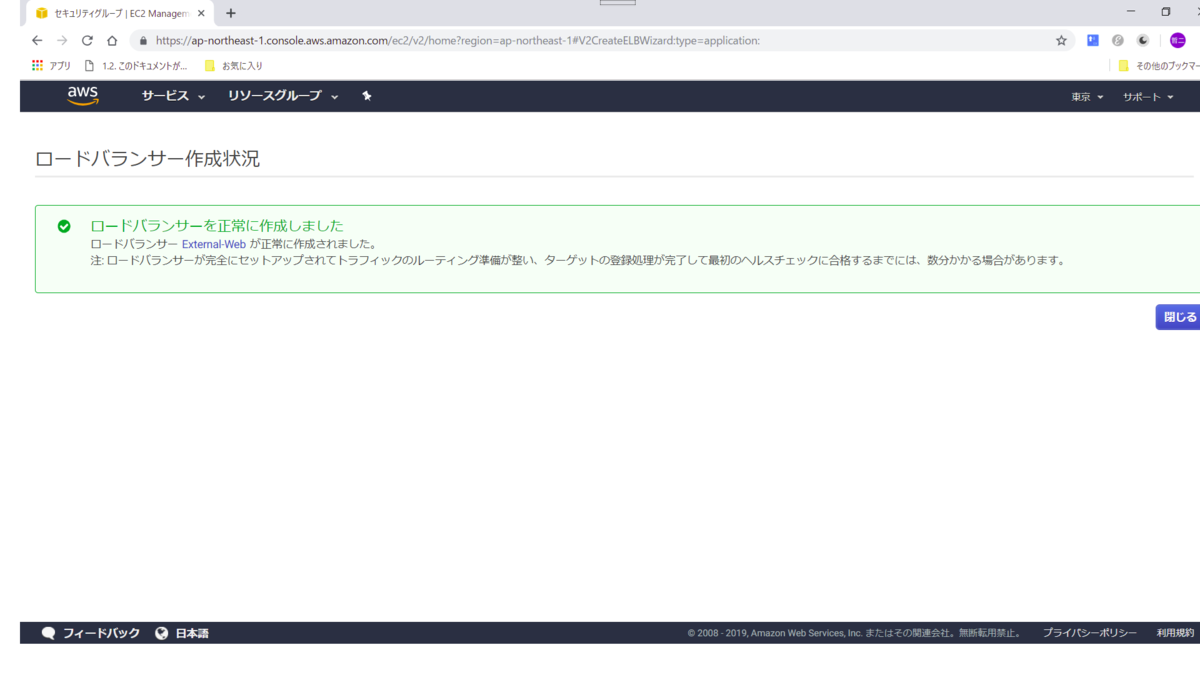
アクセス分散を確認する
片方の EC2 には「Hello World」を表示する index.html
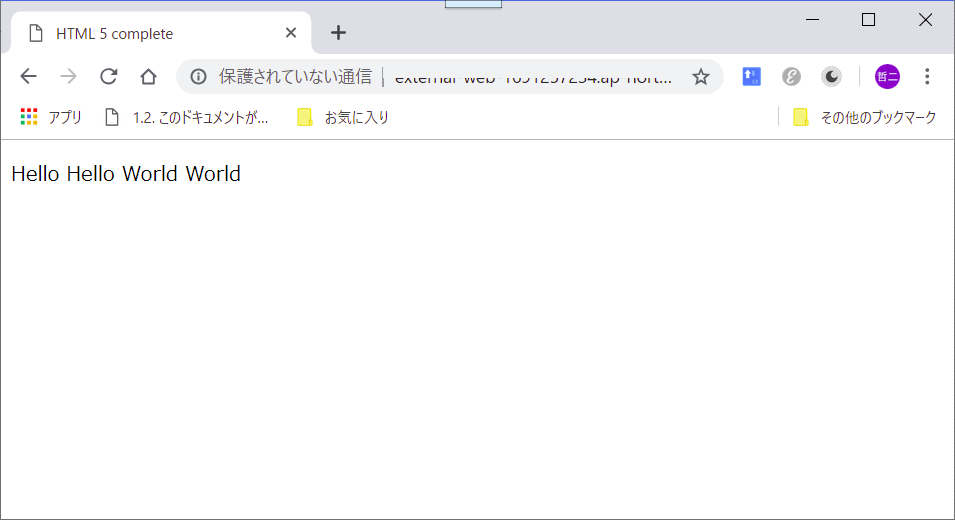
もう片方の EC2 には「Hello Hello World World」を表示する index.html をの http のルートに置きました。
数回アクセスすると下記のように画面が交互に入れ替わるのが分かります。

感想
やっと今回 ELB を試すことができました。
作るまでの手順が多くて手間がかかり、いざ試してみると上記のように文字が変わるだけというわりと地味な結果となりました。
数年前にAzureでも似たようなことをしたこともありましたが、わりとどこも同じような感じなのですねぇ。
それではまた
先日LTしました
こんにちはふるてつです。
先日「【福岡】読んだ内容まとめてLT会#7」に参加してきました。
このイベントの裏テーマの一つ「もっと気軽に学んだ内容をアウトプットして成長しようぜ!」に感化され私もLTしてきました。
当日の内容を載せます。
熟知している本の方が良いと思い、1年以上前に社員教育で使った本のことを書きました。
初心者向けの内容ですがそこはあまり気にしないでください。
感想
マテリアルな感じの色合いを心掛けたので、前回より資料はきれいになりました。
淡い色がにじんでしまいましたがそこは気にしてません。
人前で話すことにはまだなれません。
まだまだ回数をこなさないと。
というわけで次こそもっと良い感じに話したいなと思いました。
では。
Topcoderの過去問 - AB
今日すること
こんにちはふるてつです。
今日はちょっとしたネタです。
わたしは職場に1時間ほど早く来て、その時間で少しずつ topcoder の過去問を解いています。
過去問のページは表示に時間がかかり、朝早くでないとまともに見れないので早起きします。
ちなみにわたしのペースだと、1問解けるまでに1~2週間ほどかかります。
Topcoderのサイトです。
https://www.topcoder.com/

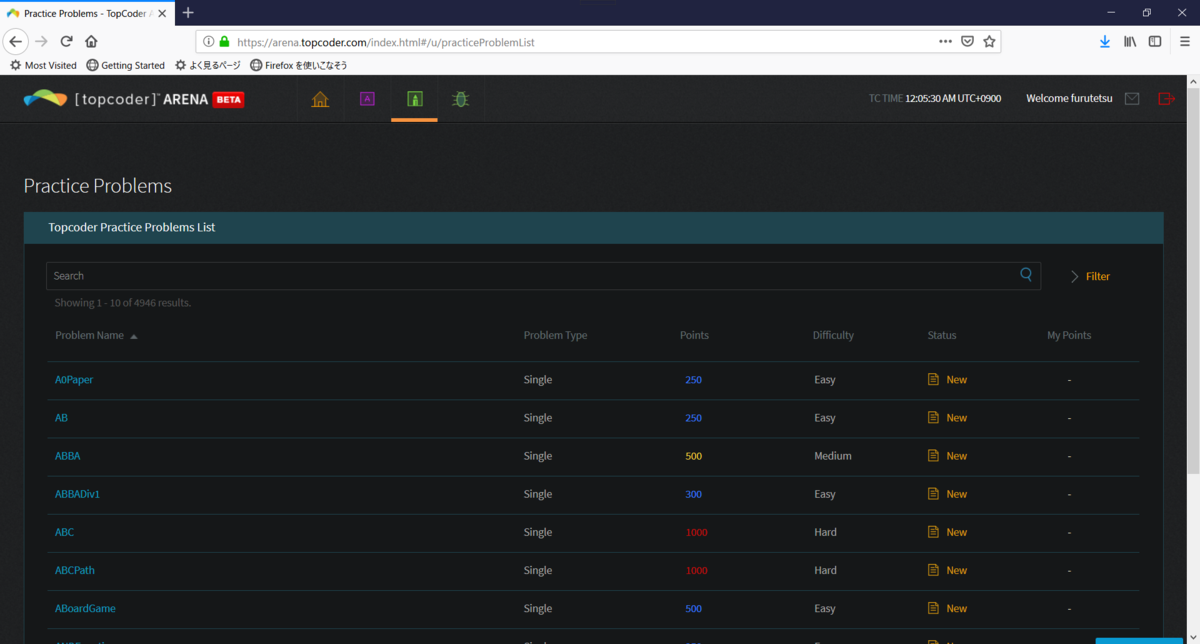
過去問の一覧はこのような画面です。
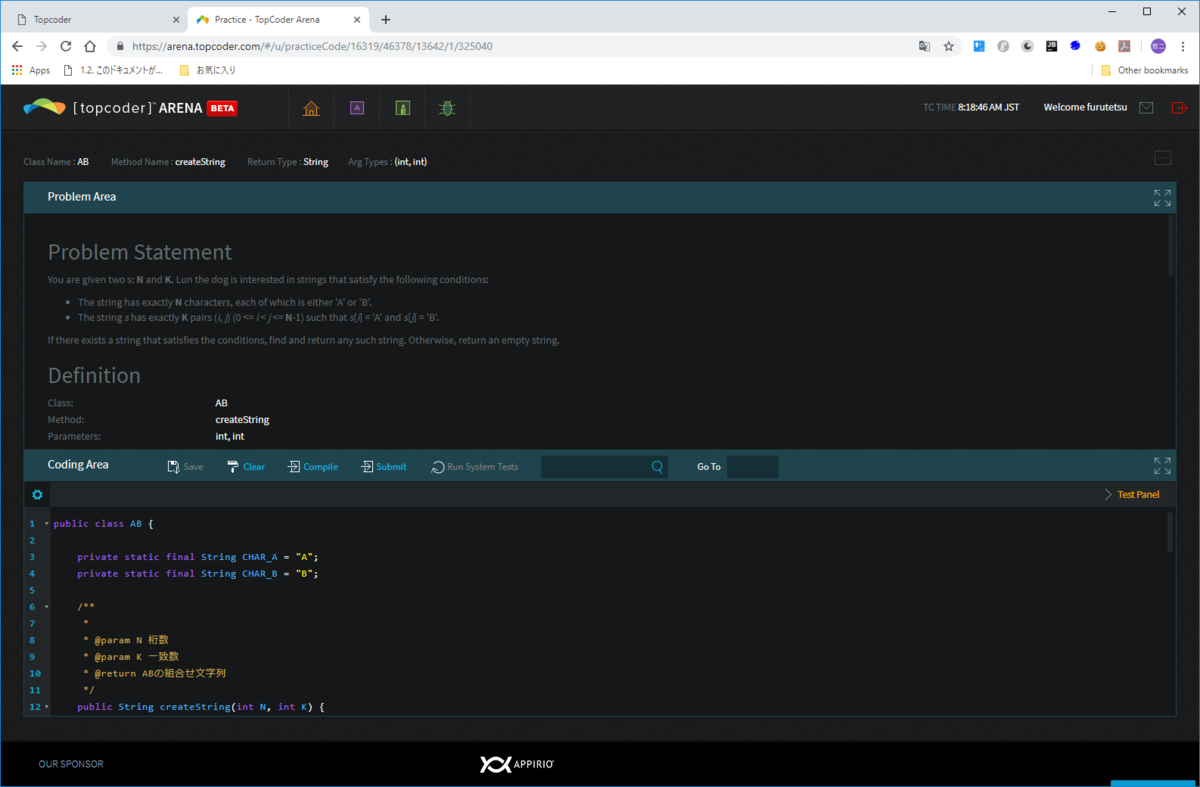
下は問題文と回答を登録する画面です(上半分が問題、下半分が回答)
問題について
今日の問題はABです。
ランダムなAとBの文字の組み合わせの中から、引数で渡した条件に合うAB文字列を返すメソッドを作れという問題です。
引数は下記2つです。
int N:AB文字列の桁数
int K:文字列中でAが左でBが右に並ぶ組み合わせ数
戻り値はstringで上記引数を満たすAB文字列を返します。
例えば、"AAB" だとか、"ABBA" だとか。
英語の原文はこちらです
Problem Statement
You are given two s: N and K. Lun the dog is interested in strings that satisfy the following conditions:

The string has exactly N characters, each of which is either 'A' or 'B'.
The string s has exactly K pairs (i, j) (0 <= i < j <= N-1) such that s[i] = 'A' and s[j] = 'B'.
If there exists a string that satisfies the conditions, find and return any such string. Otherwise, return an empty string.

Definition
Class: AB
Method: createString
Parameters: int, int
Returns: String
Method signature: String createString(int N, int K)
(be sure your method is public)
Limits
Time limit (s): 2.000
Memory limit (MB): 256
Constraints
- N will be between 2 and 50, inclusive.
- K will be between 0 and N(N-1)/2, inclusive.
Examples

0)
3
2
Returns: "ABB"
This string has exactly two pairs (i, j) mentioned in the statement: (0, 1) and (0, 2).

1)
2
0
Returns: "BA"
Please note that there are valid test cases with K = 0.

2)
5
8
Returns: ""
Five characters is too short for this value of K.

3)
10
12
Returns: "BAABBABAAB"
Please note that this is an example of a solution; other valid solutions will also be accepted.
This problem statement is the exclusive and proprietary property of TopCoder, Inc. Any unauthorized use or reproduction of this information without the prior written consent of TopCoder, Inc. is strictly prohibited. (c)2003, TopCoder, Inc. All rights reserved.
わたしの解答
わたしの解答コードは下記になります。
結局文字列の組み合わせを総当たりでチェックして、
引数で渡された条件に合った場合にAB文字列を返すようにしました。
public class AB {
    private static final String CHAR_A = "A";
    private static final String CHAR_B = "B";

    /**
     *
     * @param N 桁数
     * @param K 一致数
     * @return ABの組合せ文字列
     */
    public String createString(int N, int K) {

        String AB[] = new String[N];
        setUpAB(N, AB);

        for (int i = 0; i < Math.pow(2, N); i++) {
            System.out.println(String.join("", AB));

            if (countAB(AB) == K) {
                System.out.println("HIT AB:");
                return String.join("", AB);
            }
            incrementAB(AB, N);
        }
        return "";
    }

    private void setUpAB(int N, String[] AB) {
        for (int i = 0; i < N; i++) {
            AB[i] = CHAR_A;
        }
    }

    private void incrementAB(String[] ab, int N) {
        for (int i = ab.length - 1; i >= 0; i--) {
            if (CHAR_A == ab[i]) {
                ab[i] = CHAR_B;
                return;
            }
            ab[i] = CHAR_A;
        }
    }

    private int countAB(String[] ab) {
        int count = 0;

        for (int i = 0; i < ab.length; i++) {
            if (CHAR_B == ab[i]) {
                continue;
            }
            for (int j = i + 1; j < ab.length; j++) {
                if (CHAR_B == ab[j]) {
                    count++;
                }
            }
        }
        System.out.println("count:" + count);
        return count;
    }
}
下はテストコードです。
import static org.hamcrest.CoreMatchers.*;
import static org.junit.Assert.*;

import org.junit.jupiter.api.Test;

import practice.AB;

class ABTest extends AB {

    @Test
    void testCreateString() {
        assertThat(createString(3, 2), is("AAB"));

        assertThat(createString(2, 0), is("AA"));

        assertThat(createString(5, 8), is(""));
    }

}
今日の感想
AB問題はわたしにとっては結構難しかったのですが、難易度は低く「easy」とのことでした。
難しい難易度の問題を解ける方はすごいですね。
わたしは頭の体操として少しずつ解いていきたいと思います。
あと反省ですが、Stream APIを使って今風に書いたほうが良かったかしらと思いました。
では、今日もお疲れ様でした。
Angular7 + Bootstrap4 で Web アプリを作ろう - もくもく会でLTだけしました。
こんにちはふるてつです。
先日 ng_fukuoka さんが開催する「Angular もくもく会 in Fukuoka #8」に参加してきました。
いつもブログに書くのは自社内でやっているもくもく会ですが、今回は違って社外のもくもく会です。
ng-fukuoka.connpass.com
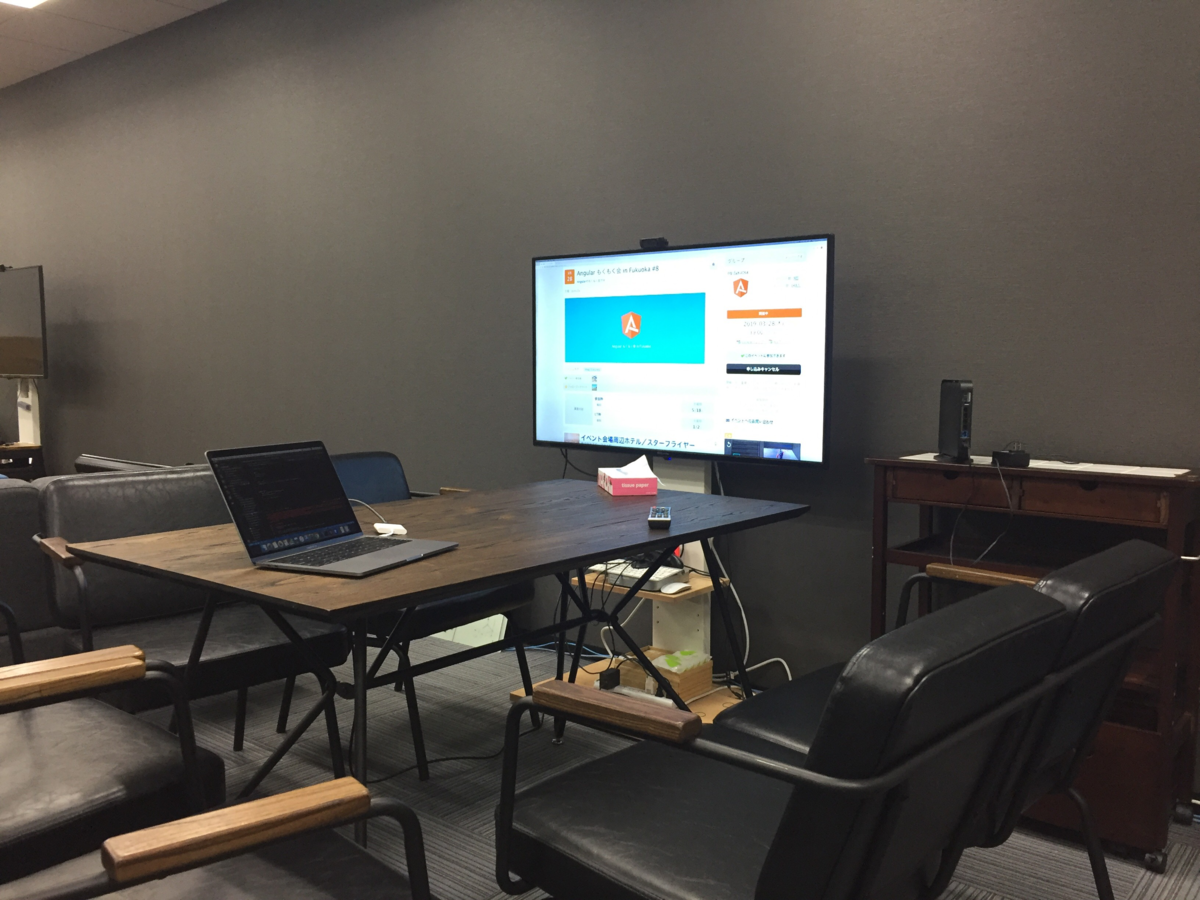
雰囲気はこんな感じです。
もくもくの内容
調べもの各種
今回は調べものばかりしていて、記事になりそうな作業はできませんでした。
ログイン後にログインユーザの情報をAngularのどこかに持たせられないか?とか
そんなことを調べていたら時間が過ぎちゃいました。
またの機会にちゃんと書きます。
初LTをしました。
LTをさせていただきました。
当日の内容を載せます。
初LTでしたので緊張しました。
speakerdeck.com
今日の感想
今回はあまりかける記事がなくて若干困りました。
LTはちょっと恥ずかしかったですね。
内容も良いとは思えないし、スライドもなんだかカッコ悪いし。
でもやらなかったよりはやったほうが良かったなと感じます。
というわけで次はもっと良い感じにしたいなと思いました。
では。